
Why Does Seasoning Cast Iron Even Matter?
Quick answer: seasoning cast iron is what turns a rough, rust-prone hunk of metal into a slick, nearly non-stick pan that can outlive the person who bought it. Skip it, and you’ll get sticky eggs and orange spots by next week.
If you’ve ever picked up a grandmother’s skillet and wondered why it’s black, glassy, and somehow better than the pan you bought last month, this is the answer. That dark surface didn’t come from the factory. It was built, layer by layer, through heat and oil.
Here in 2026, cast iron is having a moment again. Home cooks are ditching flaking non-stick pans for something that lasts decades, and seasoning cast iron properly is the one skill that decides whether that switch actually pays off.
What Actually Happens When You Season a Pan
Raw cast iron is porous. Under a microscope, the surface looks like a tiny mountain range, full of pits and grooves that trap moisture and invite rust.
Seasoning cast iron fills that terrain with something new: a thin film of oil that, once heated, doesn’t just sit on top. It chemically transforms.
Unsaturated fats contain carbon chains with reactive double bonds. When you heat a thin coat of oil past a certain point, those bonds break and reform, linking fat molecules into long, tough chains. Cooks call this polymerization, and it’s the same basic chemistry that produces plastics, just built from cooking oil instead of petroleum.
The result is a hard, plastic-like layer bonded directly to the iron. It isn’t grease sitting on the surface. It’s closer to a thin, edible varnish, and it’s exactly what makes a well-seasoned pan release eggs without a fight.
A short list of what a good seasoning layer actually does:
- Fills the microscopic pores so food can’t grip bare metal
- Blocks oxygen and moisture from reaching the iron, which slows rust
- Builds a slicker surface with every cook, especially fatty ones like bacon
- Adds a faint, pleasant flavor note that some cooks swear by
Step-by-Step: Seasoning Cast Iron the Right Way
Before starting, gather a few basics: mild dish soap, a stiff scrub brush, a dry cloth or paper towels, an oven-safe rack, a sheet of aluminum foil, and your chosen oil.
- Wash the pan with warm water and a small amount of dish soap. Modern dish soap won’t strip a properly cured seasoning layer, despite the old kitchen myth that says otherwise.
- Dry it fully, then set it on a stove burner for a minute or two to drive off any moisture hiding in the pores.
- Rub a thin coat of oil over the entire pan, not just the cooking surface. The handle, the outer walls, and the bottom all need protection from rust too.
- Wipe off the excess with a clean cloth until the pan looks almost dry. A visible sheen or pooled oil means too much was applied and will turn sticky instead of hard.
- Skip aerosol cooking sprays for this step. Most contain added lecithin and propellants that leave a gummy, uneven film instead of a clean polymerized coat.
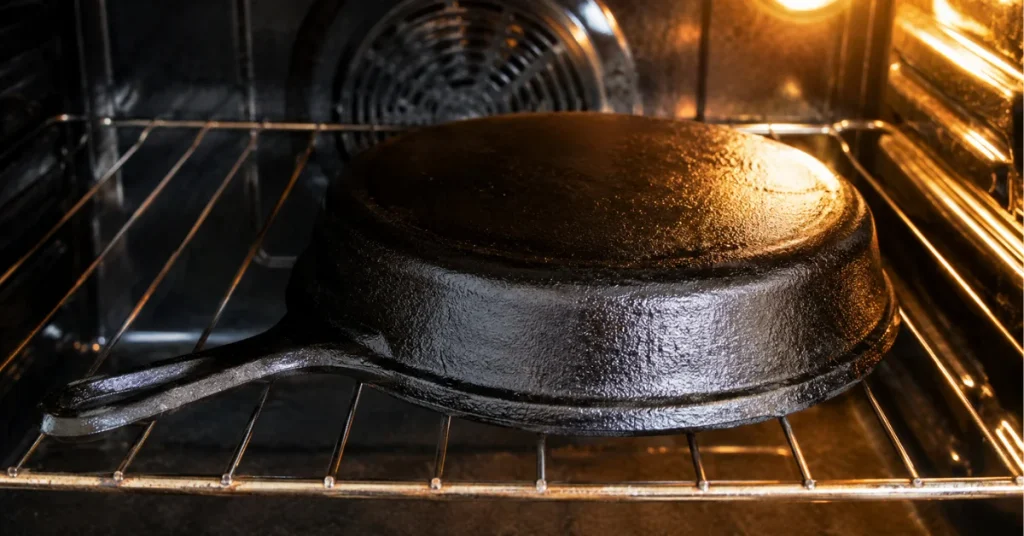
- Set the pan upside down in the oven, with a foil-lined sheet on the rack below to catch drips, and crack a window or turn on the range hood, since the bake does produce some smoke.
- Bake at 450°F to 500°F for 45 minutes to an hour, then turn the oven off and let the pan cool completely inside before handling it.
- Repeat the oil-and-bake cycle three to six times for a new or bare pan. The surface is ready when it looks evenly matte-to-glossy brown or black, with no sticky patches or dull gray spots left behind.
Which Oils Work Best for Seasoning Cast Iron
Not every oil polymerizes the same way, and the “highest smoke point wins” advice floating around the internet doesn’t hold up once you look closer.
What matters more is the fatty acid makeup of the oil. Highly unsaturated oils, like flaxseed, grapeseed, and refined vegetable oils, cross-link more readily and build a stronger bond to the iron than heavily saturated fats like plain butter.
Flaxseed oil polymerizes fast and produces a glassy, dark finish, but it can also turn brittle and flake if the layers go on too thick. Grapeseed oil sits in a sweet spot: a fairly high smoke point paired with enough unsaturation to bond well, which is why a lot of cookware specialists lean on it for everyday seasoning cast iron routines. Refined canola, sunflower, and plain vegetable oil are the reliable, budget-friendly middle ground most kitchens already have on hand.
Lard and other animal fats work too, and they were the default choice for generations of cooks before bottled vegetable oils were common. They’re more saturated than most plant oils, so the resulting layer builds more slowly but tends to feel a little less brittle over time.
Here’s a quick reference for the oils covered above:
| Oil | Approx. Smoke Point | Best For |
|---|---|---|
| Flaxseed oil | ~225°F | Fast, glassy first coats; apply extremely thin to avoid flaking |
| Grapeseed oil | ~420°F | Everyday seasoning cast iron routines and touch-ups |
| Refined canola or sunflower oil | ~400–450°F | Budget-friendly, reliable middle ground |
| Lard or tallow | ~370°F | Traditional option, slower build, less brittle finish |
Temperature: The Part Most Guides Get Wrong
This is where a lot of seasoning cast iron advice quietly falls apart. The old rule was “heat past the smoke point.” Newer testing tells a more layered story.
Polymerization actually begins below the smoke point, as the oil starts cross-linking under heat. Push well past that point and you’re not improving the bond — you’re carbonizing the oil into a brittle, flaky crust that chips off instead of protecting the pan.
The sweet spot for most home ovens sits between 450°F and 500°F, with the pan held there for 45 minutes to an hour, oiled side up or down depending on the method. A slow cool-down inside the closed oven matters just as much as the bake itself, since a rapid temperature swing can stress the new coating before it’s fully set.
Stovetop seasoning has its fans, but it’s harder to get right. Heat concentrates in the center of the pan while the edges lag behind, so you end up with a patchy coat instead of an even one. An oven, even a basic home model, distributes heat far more consistently across the whole surface.
Seasoning Cast Iron vs. Enameled and Non-Stick Pans
It helps to see where cast iron actually sits next to the alternatives, since “just buy non-stick” gets thrown around a lot without context.
Cast iron (bare, seasoned): Builds its own coating, gets better with age, handles high heat and open flame, but needs the seasoning maintained.
Enameled cast iron: Skips seasoning entirely thanks to a glass-like glaze, resists acidic foods like tomato sauce, but chips if dropped and costs noticeably more.
Synthetic non-stick (Teflon-style): Easiest short-term release, no seasoning required, but the coating degrades within a few years and can’t handle high heat or metal utensils.
Anyone who has cooked through a full rotation of pan types eventually notices the pattern: synthetic coatings offer convenience upfront and a shorter lifespan, while seasoning cast iron takes a bit of patience early on and pays that back for decades.
Common Myths About Seasoning Cast Iron
“Never use soap on cast iron.” This one is outdated. Modern dish soap is far milder than the lye-based soaps of past decades, and a quick wash won’t undo a properly cured seasoning layer. What actually strips seasoning is prolonged soaking, a dishwasher cycle, or aggressive steel wool scrubbing.
“Seasoned cast iron doesn’t work on induction.” It does. Cast iron is magnetic and heats normally on induction cooktops, though the pan needs a flat, smooth base to sit evenly on the glass surface. A slightly warped or heavily ridged bottom can cause uneven contact and hot spots.
“Humid climates ruin cast iron.” Humidity does speed up rust on bare or thin spots, since moisture in the air settles into any exposed metal faster than in a dry kitchen. Cooks in humid regions generally need to wipe on a light layer of oil more often to stay ahead of it.
“All cast iron pieces season the same way.” Ridged griddles and grill pans need extra attention in the grooves, where oil pools more easily than on a flat skillet surface. Dutch oven lids also need their own coat, inside and out, since they’re just as exposed to moisture as the base.
What Food Science Actually Confirms About the Bond
Food scientists who’ve tracked seasoning chemistry closely describe polymerization as a genuine molecular transformation, not just “baked-on oil”: small fat molecules, or monomers, link into long polymer chains under heat, the same basic process that builds synthetic plastics.
That distinction matters practically. It’s why a rushed, overly thick coat of oil often turns gummy instead of hard: the fat needs time and the right temperature range to fully cross-link, and skipping steps just leaves you with sticky, half-cured residue instead of a true polymer layer.
Interest in the topic has grown alongside the broader return to durable, low-tech kitchen tools. Cooks who’ve spent years maintaining the same skillet consistently describe the same arc: a rough, matte start, followed by a slow build toward a smooth, near-black surface that only gets better with regular use.
Who Actually Needs to Worry About This
Full experience voice fits here because this is a hands-on kitchen skill, not an abstract concept.
New cast iron owners need the fundamentals first: strip any factory coating if it looks uneven, apply oil in a whisper-thin layer, and commit to two or three bake cycles before cooking anything acidic. Standing over a freshly seasoned skillet for the first time, you can actually watch it shift from dull gray to a deep, satiny brown.
Cooks reviving a rusty inherited pan face a different job. Strip the rust back with fine steel wool or a vinegar soak, dry it completely, and then start the seasoning process from scratch as if the pan were new. Skipping the strip step just seals rust underneath the new coating.
Renters and small-kitchen cooks without a reliable oven can still manage a passable stovetop seasoning, though it takes more attention to keep the heat even across the whole pan rather than concentrated in the center.
Restaurant and commercial kitchens tend to lean on frequent cooking rather than dedicated seasoning sessions, since daily use with oil-heavy foods keeps building the coating naturally without ever pulling the pan out of rotation.
Anyone breaking in a fresh seasoning should also think about what goes in the pan first. Fatty, forgiving foods like bacon, sausage, or fried potatoes help thicken the coating with every cook. Delicate foods like eggs or fish fillets are best saved for a few weeks in, once the surface has proven it can release food cleanly on its own.
Common Mistakes That Ruin a Seasoning Job
A few habits quietly undo good seasoning cast iron work more often than anything else:
- Using too much oil, which pools and turns sticky instead of polymerizing cleanly
- Skipping the full cool-down and yanking a hot pan straight into cold water
- Cooking acidic tomato sauces or citrus dishes before the coating has built up
- Scrubbing with steel wool or harsh detergent on a still-new layer
- Storing the pan with a lid on while any moisture is trapped inside
None of these ruin a pan permanently. Cast iron is famously forgiving. Worst case, you strip it and start the seasoning process over.
If the seasoning has already turned patchy or blotchy, a full strip usually isn’t necessary. A light spot with exposed gray metal just needs another thin coat of oil and one more bake cycle over that area. Only a pan that’s rusted through, flaking, or gummy all over calls for stripping it back to bare metal and starting fresh.
Storage matters just as much as the seasoning process itself. Slip a folded paper towel between stacked pans to absorb any trapped moisture, store the pan with the lid off or slightly ajar, and keep it out of the dishwasher permanently, since prolonged detergent exposure and heat cycles wear down the coating faster than regular handwashing ever would.
Conclusion
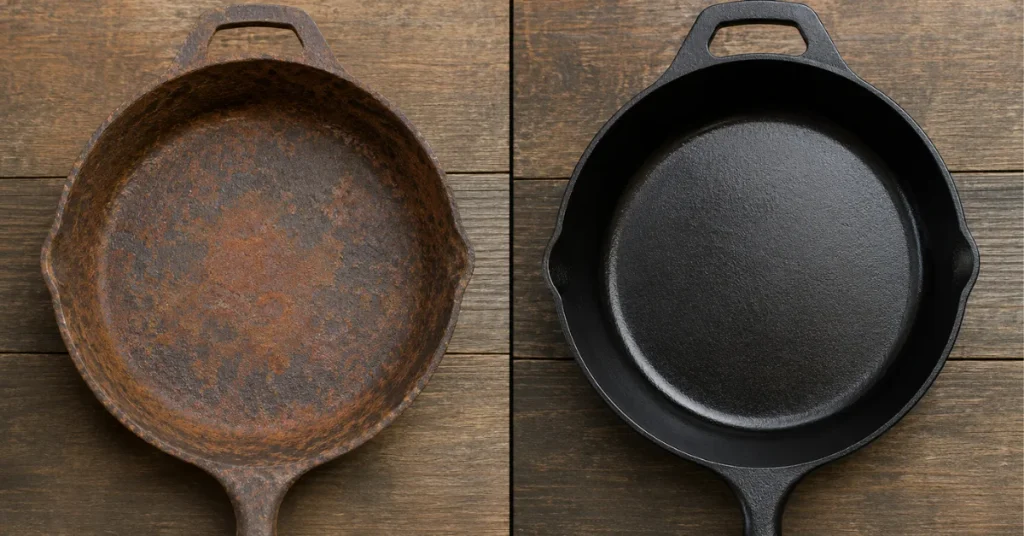
Seasoning cast iron isn’t folklore or kitchen mysticism. It’s a straightforward chemical process: thin layers of the right oil, real heat, and enough patience to let polymerization actually finish. Get the oil, the temperature, and the cool-down right, and the pan does the rest, building a tougher, glossier surface every time it hits the stove. Whether you’re breaking in a first skillet or reviving one that’s been sitting in a garage for a decade, seasoning cast iron the right way is the difference between a pan you fight with and one you’ll hand down.
A well-seasoned pan earns its keep beyond steak and eggs too. The same skillet works just as well for a humble pot of simmered lentils.
FAQs
Do I need to season a brand-new cast iron skillet?
Most modern skillets arrive pre-seasoned and are ready to cook on immediately, but adding one or two extra coats before the first use tends to build a sturdier base layer.
How often should I re-season my pan?
Only when it needs it — dry, dull, or patchy spots are the signal. Regular cooking with a little oil often maintains the coating without a dedicated session at all.
Can I use olive oil for seasoning cast iron?
It’s better saved for cooking than seasoning. Its lower smoke point means it can scorch before it fully polymerizes, leaving a stickier, less durable coat than grapeseed or refined vegetable oil.
Why is my seasoning coming out sticky instead of hard?
Almost always too much oil or not enough heat. Wipe the pan until it looks nearly dry before baking, and make sure the oven actually reaches the target temperature throughout the bake.
Is it safe to cook acidic foods in a seasoned cast iron pan?
Once the seasoning is well established, occasional tomato sauce or a squeeze of lemon is fine. On a brand-new or thin coating, acidic foods can strip the layer faster than normal cooking would.